Thursday, August 25, 2011

I just called to say I love you.

I'm still new to the idea of "going antiquing". I grew up in California, and somehow the idea of antiques wasn't one that got people excited. Our homes were all new(ish), modern, edgy, or beach casual, and while we may have admired things that looked like antiques, they were in all likelihood Pottery Barn quality antique. I'm sure I saw antique stores here and there growing up, but to be honest I can't recall any memories of them.

In contrast, living in a 161 year old house, antiques are now screaming out for us to find them and use them as decor. So a few weekends ago we went on an antique-driven road trip across the finger lakes. Our final destination was the "Bloomfield Antique Mile" just southeast of Rochester. We figured we'd hit a few stores on the way and enjoy the scenic drive along the top of the finger lake chain. We got to take a 5 minute detour to drive by the NY Wine and Culinary Center, which got me all sorts of excited about going back to take cooking classes and celebrate special occasions.

We started at the Auburn Flea Market/Antique Co-op. We did our best to pick through the piles of junk on the flea market side, but it was so overwhelming and felt like a hoarders house of broken, useless items that we both felt a little sick after walking around for 20 minutes. There were a few possibly promising items, but it wasn't worth standing in a pile of trash to make decisions about them. The Co-op however was organized and full of fantastic finds. In particular, an old water heater in great shape caught our eye. It was industrial yet funky looking and would certainly be an interesting piece of "art". It was even affordable at $30, but neither of us could think of exactly where it would belong in the house, so we moved on.

By the time we got to Bloomfield I had visions of finally finding my dream antique. I've been in search for an old Singer sewing table for awhile now (I plan to have a granite top cut to place over it and make it into a console table of sorts), and with the antique mile promising thousands of antiques I felt sure I'd finally find my table in good condition. Sadly, while we debated about two different sewing tables, neither had the exact right price, or was in good enough condition to bring home... so my search continues.

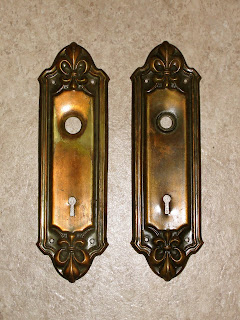
What we did take home were a few small items totaling $11. My find.... these old key hole plates with a pretty patina-like look to them. The pair was $5 and while we already have these on some of the interior doors in the house, my plan for this set will be as wall art. I plan to place large hooks in the door knob holes that will hold coats, purses, umbrellas, or whatever else hangs on a hook, so that they are functional but also pretty. I've always been confused by how to create wall art, so our homes have always been full of (ok, overloaded with) personal pictures, but touches like this help me get closer to my vision of mixing the two together.


Tom's find.... a 9 inch tall wooden telephone booth. Maybe not terribly "antique", but we've oddly been looking for a small telephone booth for our shelves for awhile so I was pretty excited that we scored this for $6. Upon checking out we noticed a crank on the bottom of the booth - surprise music box! We cranked it up.... and nothing. Not until we got home and opened the little door on the front did it start playing music. The best part, it plays "I just called to say I love you"... so sweet and unexpected.


Wednesday, August 24, 2011

Tasty Thai Chicken

At the request of a friend, today's post will be short and sweet, but feature a very popular recipe of Tom's - smoked Thai chicken. Well, actually I'm leaving out the smoked chicken part, because the whole world hasn't jumped on the smoker bandwagon with us yet (but really, you should).... so if there are any requests for the brine recipe or smoking techniques leave a comment and I'll update this post. We of course do brine a whole chicken overnight then smoke it for about 4 hours the next day and pull it before mixing in this amazing Thai sauce from Tom's favorite cookbook.

Thai Sweet and Spicy Garlic Sauce
Makes about 1 cup (we always double it!)

1/2 cup sugar
1/2 cup white vinegar
1/2 cup water
6 garlic cloves, peeled and grated
1 teaspoon kosher salt
1 tablespoon dried crushed red-pepper flakes

Combine the sugar, vinegar, water, garlic, and salt in a saucepan over medium-high heat.
Bring the mixture to a boil, whisking continuously.
Reduce heat to low and simmer the sauce until it has thickened to the consistency of runny syrup (20-25 minutes).
Remove from heat.
Stir in the dried crushed red pepper flakes.
Let the sauce stand at room temperature for 1 hour before serving to allow the flavors to meld.
Store, refrigerated, for up to two days.

Yes, you have to prepare this ahead of time to get the best flavor, so it's not a throw together last minute kind of recipe. But, the beauty of the sauce is that you could really use this for a variety of foods. Would probably be all sorts of fantastic over stir fry, drizzled over a rice side dish, with both chicken and shrimp, and I'd even venture to say I'd happily eat an asian salad using a touch of this as dressing.

Sadly, no picture today... we tend to finish this one off quickly every time we make it.

Tuesday, August 23, 2011

Entry Makeover

Our sad old entry area had this beauty (ha!) centered on the wall that we picked up for $5 from a consignment shop in the village.


When we bought it we planned to paint and distress it to give it some interest, but for only $5 we ultimately saw a practical place to keep our keys, sunglasses, and sometimes mail or shopping lists. Unfortunately, we hung it to see what we thought of it, immediately disliked it, but left it in place for about 5 months because that wall needed something (anything).... and it really was practical.

Eventually I'd had enough of the goofy shelving unit that had no business in our home, much less providing the first impression to the house, and took it down, spackled, and repainted the scratched up surface it was hiding, and looked for some inspiration for my blank canvas. And here's what I came up with.


These silhouette photos of our pups (sorry for the quality, they're phone pics) combined with a project I saw on one of my favorite DIY blogs gave me hope I could create some free art for the wall and combine it with a few other items I already had around the house.


To create this look I searched google images for silhouette's of bulldogs and great danes. I found small (like 3''x2'') images I could print as reference guides, and then spent about an hour to create the same look freehand with a marker on a sheet of printer paper. Once I had the look I liked, I scanned it to even out the variation of black lines and reprinted. These were literally created with a Sharpie and a printer. Repurposing some cute wrought iron hooks that Tom's parents bought us back in January, and a discount shopping trip later, I'd brought the functionality back to the space.


The entry space is a corner though, so the opposite wall needed a pop of art too. We had a framed cut out of our wedding date that was supposed to hold photos, but every time I tried to put pictures into it I found it came out college collage-like and just didn't scream mature. So that poor frame has sat in a closet for the past 3 years until now, at which point I decided to go simple and find patterned paper to place in the negative space instead. The green print still isn't quite right (it's too blue of a green for our room), but I love the idea and it's perfect for the space.

And here's the finished product. I love that this space now has function and design, and it cost a grand total of $20 ($3 clearance shelf from Target, $2 ceramic bird from Home Goods, and frames on sale for 2 for $15).

Monday, August 22, 2011

Getting Corny


Last week Tom traveled to Las Vegas for work, and came home raving about Bobby Flay's restaurant Mesa Grill. Not that I'm complaining... of all things for him to focus on in Vegas I'm very supportive of finding new delicious recipes. One of the highlight dishes was a corn salad side that made it's way around the table and was a favorite of everyone there. So we set out to recreate the dish, and identified two Bobby Flay recipes on the Food Network's website that had components of the dish Tom fell in love with. With some creative trial and error Tom put his own twist on the recipe and came up with something similar, that I think is delicious! We made it for a BBQ this past weekend and it went over really well, so time to share it.


Grilled Corn Salad with Lime, Chipotle Aioli, and Cotija
Serves 6-8 people

8 ears of fresh corn, silks removed, husk on; soaked in cold water for 30 minutes
Canola oil (to rub down the grill)
Salt and fresh ground pepper
3 tablespoons fat free sour cream
2 limes juiced, and 1 zested
1/4 cup fresh chopped cilantro leaves
1/3 cup finely crumbled cotija cheese
1/4 cup chipotle aioli (recipe below)

Heat grill to high & grill corn until charred on all sides, 10 or so minutes.
Take off the grill and remove the kernels with a sharp knife.
Place the corn and remaining ingredients in a large skillet over high heat.
Cook, stirring occasionally, until creamy and heated through.


Chipotle Aioli
Creates 1/3 cup

1/3 cup light mayonnaise
1 teaspoon chipotle chili powder

Whisk ingredients together.


In my opinion, one of the best parts of this side dish is the way it smells. Lots of lime and fresh cilantro, mixed with the grilled flavors of the corn. We've served this dish hot and cold, and it works well both ways. So there it is, another way of serving fresh summer corn that's a bit more creative then straight off the cob - although that's a favorite of ours too!

Sunday, August 21, 2011

Officially Blogging

I registered "our" blog (lets be honest, I'll be lucky if Tom reads, much less posts anything on the blog) at least a year ago... and then came to realize I had no idea what I wanted to blog about. I admittedly read other blogs, most of which are about my friends growing family's, creative recipes, or decorating ideas and I've been inspired by all of those ideas. So... with some motivation from friends and family (but not Tom yet, he really doesn't get the blogging thing), I'm officially starting this blog. I'm not even quite sure what I'll be writing about, probably some of all the above topics (although our growing family only consists of 4 legged children for now). Bear with me while I get the hang of this, and I'll certainly appreciate feedback. For now I'm declaring this post purposeful by setting some goals for myself:

1. Learn more about my camera. It's nothing fancy, but I default to the "smart camera" function so that the camera chooses the settings for me, which gives me the feeling my pictures don't always reach their potential. I don't document enough of our lives, so I'm hoping this blog keeps me feeling obligated to do so. Maybe I'll even learn a thing or two about photoshop along the way.

2. Stay motivated to keep updating and improving this old house. Our home was built in 1850 and has wonderful character, but our last house was brand spanking new and very modern so our furniture and style didn't mesh with this old charmer. This means refinishing, scavenging antique stores, salvage yards, and home decor stores, and a lot of DIY experiences. This is all new to me, I've always considered myself creative, but not successfully crafty.

3. Keep on cooking. When we moved to Skaneateles we quickly learned that there's a lack of variety in restaurants in our tiny village of only two stoplights. We've always liked to cook, but used to favor eating out or getting take out at least a few nights a week, not really possible anymore (which in all honestly is a good thing for our wallets and waist lines). For awhile I made a goal of cooking at least one new dish a week, but even that started to fail as we identified some favorite recipes and kept coming back to those meals. So I'm going to make it a goal to try at least 3 new recipes a month and post them here to share.

I'll attempt to be fair and always give credit where it's due, but admittedly that may be difficult with recipes as I often lose track of where I find them, and almost always change them along the way. Hopefully sharing the roots of my inspirations helps you to discover new ideas too.